The Level Editor Guide
The Level Editor is one of CodeCombat’s key editors, along with the Thang Editor. All of the levels featured in the campaign are built using the level editor. This guide will give you a brief introduction on the interface and some of the important features of it.
Creating a Level
- To begin, access the level editor through the following URL: https://codecombat.com/editor/level. The user interface is as follows
- Press “Create Level”, and enter a name for your new level. Please note that level names must be unique, hence duplicates are not accepted. Finally, confirm the creation of the level.
- If successful, you should be redirected to the editor for your new level!

The UI
The interface for the level is overwhelming at first, but will be easier to handle as time goes on. At the top, there are multiple tabs, including the one highlighted by default (“Thangs”) You can switch between these tabs to alter the various elements of the level. Let’s start with our first tab, the Thangs.
Thangs
The Thangs tab is where you do most of the work, including placing objects, heroes, enemies, designing the level environment, and also editing the script for the level through the Referee object. Thangs are essentially “objects”, and are an integral part of any level in CodeCombat.
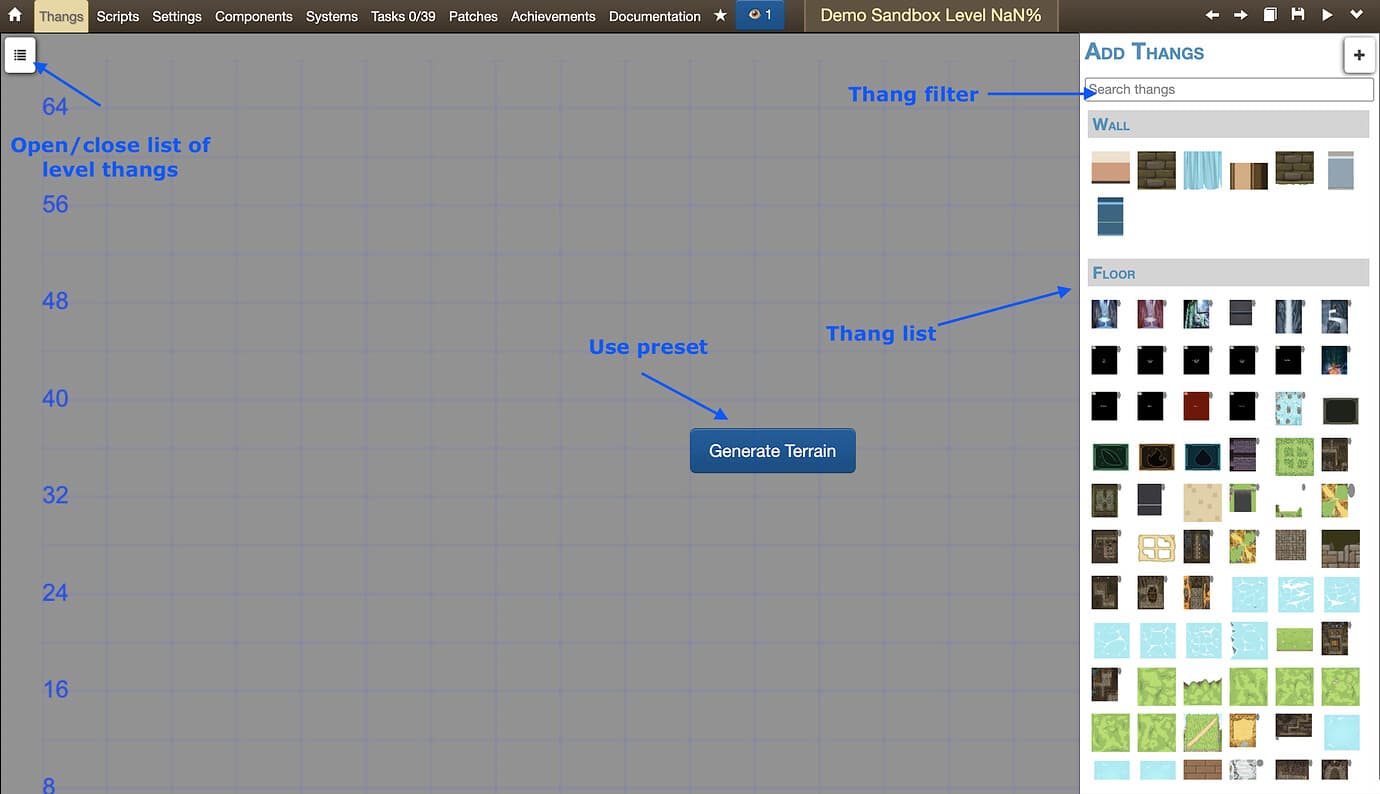
Here’s a list of the functions of some elements in the main Thangs tab
- Top Left: Hamburger button. When you place objects/thangs inside the editor, you will be able to access the list of all objects. Double-clicking an object sends you to the editor for the specific thang.
- Center: Generate Terrain. Press this to select from a variety of presets to build the level from, including from dungeon to glacier worlds. This is recommended if you’re not sure about how to build the terrain for these levels
- Right: Add Thangs Tab. This is a library of placeable objects. We will go in depth when covering basic level creation later. You can also search for specific thang names.
Thangs (Internal Thang Editor)
To access this section, place any thang. For the best experience, generate a random small terrain, and then place a unit, such as an “Archer” or “Ogre”. Then, double-click on that unit to open up the internal thang-specific editor. You should see something like the following

In the left are the list of “Components”, and on the right, you can see the specific parameters for each component, if there are any. For most units(which have health, attack, etc.), there are alliance.Allied (for selecting alliances), combat.Attackable (for health), and movement.Moves (for speed). Press any of them, and you will be redirected to the respective component. There, you can modify these parameters for your liking.
Scripts
The next tab is the scripts tab. You can go to this by going to “Back to All Thangs”, and then selecting the 2nd tab at the top. This is generally for the more advanced artisans, but you can edit world camera boundaries, music, etc. In addition, you can “add” scripts to choreograph things like narration, camera movement, and even playback! For the best learning experience, it is best to visit levels that have these, such as the early dungeon levels.
Settings
For the casual level editor, the settings tab is the second-most used tab next to the main thangs tab. This is where you will edit everything from level name to the hints guide. Here’s a basic rundown of what you can do here:
- Name: Edit the level name
- Description: Edit the description, which you see in the main campaign view.
- Loading Tip: Edit the loading tip, which you see when loading the level.
- Documentation: Has two categories. Specific articles refer to the level-specific guide. Use the name “Overview” if you want it to appear when you first load in. General articles are shared amongst levels, and you can search for ones you want to include.
- Restricted/Required Properties: If there are certain concepts you require the user to have, input the type of action, and the game will automatically require gear that has that certain moveset. If you need to require specific gear, then you can also edit Required/Restricted Gear.
- Score Types: This is for generating a leaderboard after a player completes a level. You can select from types like fastest time to most damage.

Components
Access this tab to see the very framework of each level. Components are lego-bricks that build up each thang and level, and the component editor is where you can edit everything from AI logic to abilities that are included in your gear! These components are currently editable and creatable by admins and artisans only, but if you have knowledge of coffeescript or javascript, it is worth a look!
Systems
This is another advanced tab that controls the “rules” of the levels. Imagine components as secondary modifiers of each thang, while systems regulate the fundamentals, like the physics, combat, and everything essential. This is also where you can change the “lifespan” of the level, which means you can change how long the maximum play-time during the run-through is. Access that property by selecting Existence and then changing lifespan. Here, you can also edit frame-rate (lower = less lag) and Random Seed, which determines when the seed number for random number generation in levels is done.
Tasks
Each level has its own tasks tab, which lists some recommended tasks to complete. By default, there are 39 that acts as a guide for level completion. You can also add custom tasks by pressing the “Add Task” button at the bottom. Please use this to help direct your level editing experience!
Patches
There are times where levels are made with more than one person, and many of our players spot bugs and help fix them! These “suggestions” or “patches”, are accessible in the Patches tab. If you are the level creator, you can choose to incorporate them, or reject them. Each patch will show you the patch notes + the diff view that shows the before/after of what the suggestor modified.
Achievements
This is where you will reward players with items, gems, and XP! Unfortunately, this is only editable by admins or artisans to prevent abuse.
Documentation
This tab will let you access the code and the description of all Components and Systems. It’s useful if you want to quickly find the code for another component to use for your own component, or just want to see how different abilities are made! You can toggle viewing the code through the “Toggle all code” button. Alternatively, you can press the “code” button under each component to just view the code for that component.

The Top Right Buttons

At the top right, you will see a variety of buttons. Here’s a rundown of what they do (from left to right):
- Left/Right arrows: Acts as Undo/Redo. You can also use CTRL Z and CRTL Y respectively.
- Artisan Submission: You can submit a level to the artisan compendium to be reviewed, and potentially incorporated. While this was a key feature for player-created levels back in early 2013~2014, it is now deprecated.
- Save Button: You can use this to save the level permanently (you can still revert changes later) If you’re editing another persons’ level, then you can include patch notes and submit a patch.
- Play Button: You can play the current version of the level (regardless of whether you saved) to see how your changes affect the level. This is extremely useful when editing a level because it negates the need to save to see updated changes.
- More Actions: The down arrow will send you to a list of more actions. You can choose to “watch” a level, which will send emails whenever someone sends a patch or changes your level. You can also choose to “Fork” a level, which is essentially cloning a level for you to edit. This is useful when you’re trying to learn the logistics of level-building, and want a template level to start with. Finally, version history is where you can access all of the previous edits, as well as revert to an older version if needed.

Building the Level
Let’s now try making our first level!
- Start by adding a “Hero Placeholder” thang into the level. (Located in “Units”) Click on the icon, then click anywhere on the gray-screen to place one.
- Choose a floor from the “Floor” category. Place them in the level and make sure they don’t overlap.
- At this stage, it should look like this:
- Next, add some “outline” in the level. This is to prevent units from going outside the level zone. Choose “clumps/stands” or “obstacles”
- To test what the level looks like, press the play button(
 )
)
- Next, add some enemies to the level. Start by adding a munchkin and press play again.
- Now go back to the editor and go to the “settings” tab and open “goals”
- By default there is a “defeat ogres” and “save hero” goal. Select. “hidden” in “humans-survive” goal and press delete/backspace and press play. After the level loads, put code to kill the munchkin. You should see “success” show up.
Voila! You just finished making your first working level! Let’s go on to polish the level.


Polishing the Level
Starter Code
- Starter code is vital in providing players with a sense of direction when attempting a level. Go to the “Thangs” tab and double-click Hero Placeholder. Go to the “Programmable” component and open up “plan”
- Press the
 button and select “Comments”. Name the comment “Intro”, and type something you want the player to know.
- Then, in the source code editor, replace “Should fill in some default source” with
<%= intro %>(Keep the //) - Open up “languages” and do the same for the python code.
- Press play and press the
 button. You should see the comment now in the player starter code!
Congrats! Now you can provide players with starter code!


Hints Guide
- Another useful way to assist players is via. the Hints Guide. Go back to the “settings” tab and open “Documentation”
- Select specific articles
- Press
- Choose a name, and add “content”
- In the content, you should provide some help if the player is stuck.
- Press play, and you should see the “Hints” button show up!
Woo! Now you can provide players with hints in-case they are stuck.


Decoration
- Without some set decoration, the level will look bland. Go back to the thangs tab, and add some decoration. To prevent collision, select the added decoration, and press Alt/Option + C to toggle off collision! With just a few minutes of adding decoration, your level will look much better!

Referee
- The referee is a special thang that can control various aspects of the level, including waves, gold spawns, etc. If you are not familiar with JavaScript or Coffeescript, then it is recommended that you review levels using those languages before going forward. Begin by adding a referee in the editor.
- Double click the referee and go to misc.Referee. Press and add extraCode. (Or extraCodeJS if you’re using JS)
setUpLevel: Set up level, such as adding thangs before the level loads.
onFirstFrame: Put actions to happen in the very first frame of the level here.
chooseAction: Put actions to happen every frame here.
checkVictory: Useful to check if a condition is met for a victory. - To start off, uncomment
onFirstFrame, and add the following code in it and press play.
Coffeescript:@hero.say("Hello World!")
JS:this.hero.say("Hello World!"); - On the first frame, your hero should say “Hello World!”
- Here’s a list of some useful methods in the referee:


- Getting world time: CS:
@world.ageJS:this.world.age - Defining a hero: CS:
@heroJS:this.hero - Choosing a thang by ID: CS:
@world.getThangByID("ID")JS:this.world.getThangByID("ID") - Array of all thangs: CS:
@world.thangsJS:this.world.thangs - Building a thang: CS:
@instabuild("buildable",x,y)JS:this.instabuild("buildable",x,y) - Deal damage: CS:
thang.takeDamage(damage)JS:thang.takeDamage(damage) - Remove from game: CS:
thang.setExists(false)JS:thang.setExists(false) - Set goal state: CS:
@world.setGoalState("goal", "state")JS:this.world.setGoalState("goal", "state")
If you have any questions regarding level design, please let me know in this thread.


